Up and running with K8s
Kubernetes is the premier technology for deploying and managing large apps. In this article, we’ll get up and running with K8s on your local machine. Then you’ll Deploy your first app. Finally, you’ll see the top K8s commands to know.
If you’re new to Kubernetes, check out my previous article to learn fundamental K8s concepts.
Let’s set sail!

Lots of containers on a ship.
Running K8s Locally
Until recently, Minikube was the primary means of creating a local, single-node Kubernetes cluster. It works on Mac, Windows, and Linux. Minikube runs inside a virtual environment with drivers for many different virtual environments. It also has an extensive API. However, when using Minikube with VirtualBox, I found it to be slow and buggy.
If you are playing with K8s locally on a Mac or Windows machine, I recommend you use the K8s version that comes with Docker Desktop. It uses HyperKit as its virtual environment. I found it to be a breath of fresh air.
If you’re using a Linux machine with K8s locally, check out MicroK8s. It’s lightweight and uses a snap instead of a virtual environment.
For this article, I’m running K8s v1.13.0 from Docker Desktop CE, Edgeversion in April 2019.
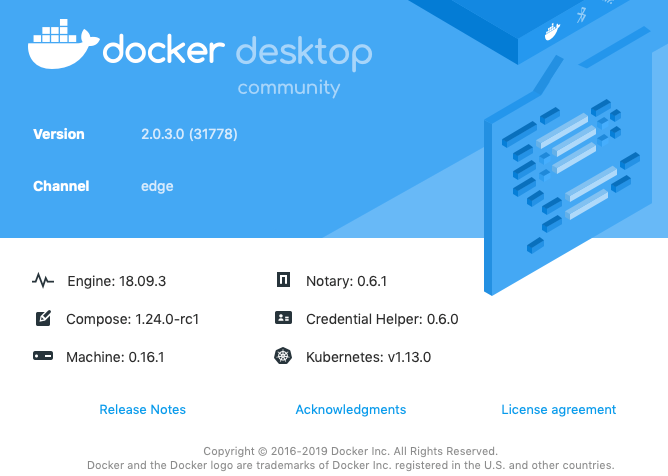
To install and start K8s on a Mac, first, download Docker Desktop with K8s here.
Once installed, go to your apps and start Docker. Install and start K8s by selecting Preferences from the Docker icon at the top of your screen.

Select the Kubernetes tab and check the Enable Kubernetes box.
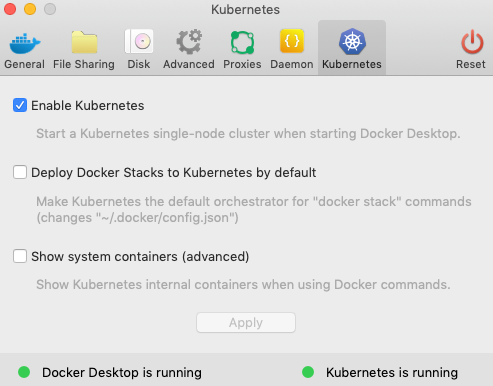
Agree to install Kubernetes. It might take a minute or two to fire up. Click on the Docker dropdown and you should see Kubernetes is starting and then eventually, Kubernetes is running.
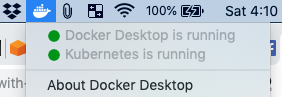
If you see two green circles, then you’re set! If you don’t see two green circles, Google and Stack Overflow are a developer’s best friends.
Your First K8s App
Let’s make a hello world Deployment that will pull a Docker image for a node.js app. Our app will display Hello World in the browser. In production, you’ll do things differently. This exercise is the first few steps to get your feet wet.
With K8s running, enter the following command in your terminal:
kubectl create deployment hello-node --image=gcr.io/hello-minikube-zero-install/hello-node
We’re using the kubectl API to create a deployment named hello-node that uses a Docker image stored in the Google Container Registry. We’re using the Docker container from the official Kubernetes Hello Minikube tutorial.
Here are the contents of the Dockerfile:
EXPOSE 8080
COPY server.js .
CMD node server.js
We’re using an official node.js image, copying the contents of server.js, exposing port 8080, and running the server.js program with node. For more on Docker files, check out my article here.
Here’s the server.js app code:
var http = require('http');
console.log(‘Received request for URL: ‘ + request.url);
response.writeHead(200);
response.end(‘Hello World!’);
};
var www = http.createServer(handleRequest);
www.listen(8080);
This code will create a server that listens on port 8080. When the server receives a request, it writes a helpful message to the console and returns “Hello World!”.
After running the kubectl create command, you should see a message in your terminal that your Deployment has been created. Your app won’t be ready to use right away, though. K8s needs to pull the Docker image and spin up your container.
You can view the status of all K8s resources with kubectl get all. It will take a few minutes to pull the image and spin up the container, so you’ll probably enter this command a few times. You can peak behind the curtain and see what K8s is doing with kubectl get events.
When you see 1 Pod is showing Available, you’re good to go.

To make the Pod accessible to the world outside the K8s cluster, you need to expose the Pod as a Service. Create a Service with the command kubectl expose deployment hello-node --type=LoadBalancer --port=8080.
You specified the name of the Cluster, the type of Service, and the port for it to use. Not all Service types create an IP that can be accessed from the outside world, but LoadBalancer does.
You should be able to see that the Service has been created by entering kubectl get services in your shell.
Assuming you’re running K8s locally, navigate your browser to http://www.experfy.com:8080/ and you should see the message “Hello World!”.

Hello World!
Instead of creating and specifying your whole Deployment and Service via the command line, you could have specified them in a YAML file. Using a file has several advantages, including reusability and documentation. We’ll cover YAML specification files in depth in future articles, so follow me to make sure you don’t miss them.
Now let’s check out popular K8s commands.
kubectl

Cubes
kubectl — pronounced “cube control” — is the command line tool for K8s. Here’s how it works:
- A kubectl command performs an action such as get, create, or describe.
- The action is performed on a resource such as a Deployment, StatefulSet, or Service.
- kubectl commands follow this format:
kubectl an_action a_resource a_resource_name --flags
Names and flags are optional in many cases.

Flags
For example, to get information about all existing Pods you could run this common command: kubectl get pods.
Tip: If you want to avoid typing kubectl a bajilllion times, make a Bash alias. With alias k='kubectl' you can just type k instead of kubectl. I show how to make Bash aliases on a Mac in this article.
Without further ado, here are the most common K8s resources and their shortcuts.
Top 11 kubectl Resources
pods, po

nodes, no

deployments, deploy

replicasets, rs

daemonsets, ds

statefulsets, sts

jobs

cronjobs, cj

services, svc

persistentvolumes, pv

persistentvolumeclaims, pvc
If you are fuzzy about these resources, check out my previous article on K8s concepts. Two other names to know are all and events.
Unsurprisingly, all is used to refer to all existing resources. kubectl get allshows essential information about running Pods, Services, Deployments, and ReplicaSets. This command is super handy.
Likewise, kubectl get events shows a history of events. It’s like a log at the K8s level instead of at the container level.
If you want to see more kubectl resources, check out the official docs here. Now let’s look at actions to apply to our resources.
Top 7 kubectl Actions
help — get help
get — display information about a resource or resources
describe — display detailed information about a resource or resources
logs — show the logs for a container
exec— enter a running process in a container
apply —create or alter a resource
delete — delete a resource or resources
Let’s look at each command briefly.
help
Type --help after a command for help with that command. For example, kubectl get pods --help.
get
kubectl get all shows essential information about running Pods, Services, Deployments, and ReplicaSets. It’s the go-to command to check the status of things. You can use get with individual objects and add the --watch flag to observe real-time updates.
describe
kubectl describe all shows lots of detailed information about pretty much everything related to your Cluster. You can use describe with individual objects, too. It’s helpful when debugging.
logs
logs requires a Pod name. My “hello world” app shows the logs for my Pod with the command kubectl logs hello-node-7f5b6bd6b8-gr7m7. Use the flag -c my-container to specify a container when multiple are in a Pod. Use the --previous flag to get info about a container that is no longer running.

Wish my logs looked like this.
exec
exec helps you debug a container process. It allows you to execute a process within the container through a psuedo-terminal with -it. For example, to enter the container in my_pod and run Bash, enter kubectl exec -it my_pod bash.
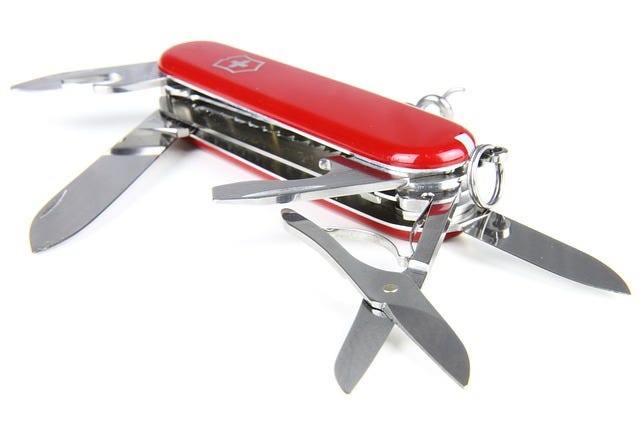
apply
Using apply with a YAML or JSON file is the recommended way to create or alter a resource. If a resource doesn’t exist, apply will create it. If it does exist, apply will alter it. apply can add Services to an applicable resource, or automate horizontal scaling of a Deployment by adding Pods.
Note that you coud use create to make a Deployment and expose to make a Service— that’s what we did above. However, using a YAML file with apply is a better option for documentation and reuse. We’ll cover that method a future article. See a discussion of best practices for creating resources here.
apply is your SwissArmy knife for creating and updating resources.
SwissArmy knife
delete
kubectl delete pod my_pod deletes the Pod named my_pod.
To delete all resources of the same type pass the --all flag. For example, you can delete all ReplicaSets with kubectl delete rs --all. Note that if you try this, the ReplicaSets will restart if you don’t delete your Deployment first.
Now you’ve seen the key K8s commands. As you become a Kubernetes n̵i̵n̵j̵a̵ peaceful warrior, you’ll acquire others. A full list of kubectl actions can be found here. Here’s a quick recap of the key commands.
Recap
Top 11 resources with shortcuts:
pods, po

nodes, no

deployments, deploy

replicasets, rs

daemonsets, ds

statefulsets, sts

jobs

cronjobs, cj

services, svc

persistentvolumes, pv

persistentvolumeclaims, pvc
Top 7 actions:
--help — get help about a resource
get — display information about a resource or resources.
describe — display detailed information about a resource or resources.
logs — show the logs for a container.
exec— enter a running process in a container.
apply —create or alter a resource.
delete — delete a resource or resources.
To go deeper, if you’re into lists, check out this longer cheatsheet.
As you explore K8s, be sure to spend some time with the official Kubernetes docs. They are detailed and can be overwhelming when starting out, but they are uncommonly well written.
Wrap
I hope you found this article useful. You saw how to set up K8s and run your first K8s app. Also, you saw how to inspect, create, and delete your K8 resources with common commands.